
Being a system administrator, troubleshooting your DHCP server DHCPD is a common task that you come across frequently. There may be problems like desktop environments going offline in a network like a machine can’t get online. You go up to the machine and you type ipconfig(in windows) command and you find out there is no network gateway, there’s no name servers and no IP address. Almost immediately you figure out that DHCP server is down. Slowly people start to loose their leases and going offline. When you work in IT, managing your DHCP server effectively is very crucial. So today we are gonna cover how we can setup DHCP server extremely quickly with very basic configuration.
This guide is intended for CENT OS users.
Finding and installing DHCPD package
So first step in installing any software on your Linux machine is to search for the relevant keyword in your software repository if you don’t know the exact name of the package to be installed. So we will execute the the command yum search keyword as shown below.
#yum search dhcp
It will show you the package list related to your keyword as shown below in the picture.
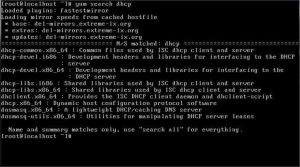
The one that we need is called dhcp-x86_64. So once you know which package to install the next task is to go ahead and install it using yum install command.
#yum install dhcp
We are gonna directly use the keyword “dhcp”. It will automatically select the required version and install it. It is going to take few seconds to download and install the setup depending upon your connection speed. Installation precess will setup all the required binaries and configuration files in place.
Setup and configure apache virutal hosts
Configuring DHCP server
For setting up your server there is one important configuration file that you use to configure and tune up your DHCP server. Sample configuration file is provided when you install DHCP server. It’s helpful to use these existing templates for configuration as you don’t have to write all the configuration directives yourself. The main file that you need to modify and configure for any other DHCPD changes is located at /etc/dhcp. So change your current directory to /etc/dhcp. In this directory there is going to be two important files. One is going to be for IPv4 and the second one is for IPv6. We need to edit either one of them. In our case we are gonna configure our network for IPv4.
In /usr/share/doc, there’s a sample file that we are going to use for our DHCP server’s configuration. Sample files are good ways to get started on something new with Linux if you don’t know the exact syntax for configuration. So go to /usr/share/doc and run ls command to locate your dhcp folder and copy the file over to /etc/dhcp directory.
#cp /usr/share/doc/dhcp/dhcp.conf.example /etc/dhcpd/dhcpd.conf
The reason we are going to copy the sample file is that dhcpd.conf file in etc directory is actually empty. So we are gonna go ahead and explain all the options directives in this configuration file. By editing these options in configuration file you can specify many important things in your network.
Things you can do by editing configuration file
- You can define multiple subnets
- You specify your domain name
- Your name servers are defined here
- Specify your default gateway
- Specify lease time for IPs
- You specify your boot servers for PXE boot
We aren’t going to configure all these things in this tutorial. What we are looking for today is very basic subnet declaration. So if your DHCP server is down and you need something really quick then you can setup this in ten minutes and have your server up and running on your network.
Firstly we are going to delete all the extra content from the configuration file that we have copied since we are doing the very basic setup of DHCP server. For this basic setup we are going to setup following things.
- Name Servers
- Default gateway
- IP address range
After setting up your configuration file, It will look this
#
# Sample configuration file for ISC dhcpd for Debian

# The ddns-updates-style parameter controls whether or not the server will
# attempt to do a DNS update when a lease is confirmed. We default to the
# behavior of the version 2 packages ('none', since DHCP v2 didn't
# have support for DDNS.)
ddns-update-style none;

# option definitions common to all supported networks...
option domain-name "example.org";
option domain-name-servers ns1.example.org, ns2.example.org;

default-lease-time 600;
max-lease-time 7200;

# If this DHCP server is the official DHCP server for the local
# network, the authoritative directive should be uncommented.
authoritative;

# Use this to send dhcp log messages to a different log file (you also
# have to hack syslog.conf to complete the redirection).
log-facility local7;

# No service will be given on this subnet, but declaring it helps the
# DHCP server to understand the network topology.

#subnet 10.152.187.0 netmask 255.255.255.0 {
#}

# This is a very basic subnet declaration.

subnet 192.168.3.0 netmask 255.255.255.0 {
  range 192.168.3.10 192.168.3.20;
  option routers 192.168.3.1;
  }
This is a minimal configuration. There are many other options that we can play with when setting up your server. But for the sake of simplicity we are just going to do very basic configuration. After saving the configuration file all you need to do is start/restart the dhcpd service as shown below.
#systemctl dhcpd restart
Options used for DHCPD setup
default-lease-time- used to define the minimum lease time for which IP address will be assigned to the node. In our case it’s 600 seconds.
max-lease-time- used to set the maximum time an IP address can be assigned to a node. In our case it’s 7200 seconds.
subnet- used to declare the subnet and netmask for a network. Other important parameters for a network are defined in this declaration such as range and network gateway.
range– used to define the range of IP addresses that our server will give out to the machines.
option routes- used to set up a networking gateway for a network.
# sign- used to write comments.


Add Comment